
Fog and Echo Lake at sunrise in Maine’s Acadia National Park.
I made this photo a few weeks ago and it seemed to resonate with people on my social networks, so here are some details of how it came about.
Where: Beech Cliffs, above Echo Lake in Maine’s Acadia National Park.
When: July 6, 2016, at 5:12 a.m.
Who: Just me.
How: I have been to this location several times, but never really managed to be there with the right conditions for a dramatic landscape photo. With clear skies in the forecast, I decided to set my alarm and make the 20 minute hike up to see what would happen. The fog and mist over Echo Lake (and spilling in from Somes Sound in the distance) added the touch of drama I was hoping for. For my composition, I framed the lake to be a diagonal to add a little energy to the photo. A wide angle lens (my Canon 24mm – 70mm F 2.8 set to 24mm) allowed me to anchor the shot with the juniper and ledge in the foreground and have enough depth of field to keep the shrub and the distant mountain in relative focus. I also used an aperture of F16 to increase depth of field. Because the sky was much brighter than the foreground, I made several photos with a 3-stop graduated split neutral density filter to try and balance my exposure, but the extra glass was creating some lens flare I didn’t like. Instead I shot several exposures at different shutter speeds without the filter with the hope I could use some post-processing magic to get the final image I wanted.

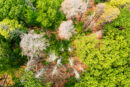
The above exposure (F16, 1/20 sec., ISO 50) gave me the right exposure for the sky, but the rest of the photo is too dark. I attempted to fix this in Lightroom by increasing the exposure on the bottom part of the image, which looked much like the final photo at the top of this post, but that added an unacceptable amount of noise in the shadows.

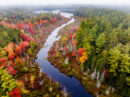
This exposure (F16, 1/5 sec., ISO 50) gave me better shadow detail, but the sky was too blown out to recover in a way that looked natural. To make my final image, I took these two exposures and opened them as layers in one Photoshop document. I made the brighter image my top layer, and added a layer mask to it. Then I just painted a hole in the mask over the sky to reveal the darker version below. A minute or two of fine-tuning the mask resulted in my final image. On the bottom 2/3 of the image, I also made adjustments in Lightrooom of +30 Clarity (to bring out some of the details in the foreground) and +50 Vibrance to give some added saturation to the juniper bush so it held its own with the bright colors of the sky.
Why: I was in Acadia working on revisions to our book Discover Acadia National Park (we’ll be releasing the 4th edition next spring). My primary goal was to get some new recreation shots during this trip, but sometimes I just need to go be myself in a quiet place and shoot landscapes. So this one was all about me having a little alone time and stress-free shooting fun!
Post a comment below if you see another photo on my website that you’d like me to write a “How and Why” about.
Cheers!
-Jerry


I’ve tended to use graduated ND filters myself, but I find it unsatisfactory especially with horizon lines that are more complex, so doing realistic HDR or use of layer masks is what I need to learn.
Thanks again!
Hi Hillel – here’s the link to a short article I wrote on using layer masks to accomplish what I described in this post. It’s a few years old, so some of the software may have changed slightly, but the concepts should still work: http://monkmanphoto.com/archives/773
-Jerry